About Me

My photo
Montreal, Quebec, Canada
I am a certified esthetician only out of school for two years, but figured it would be a nice idea to start a blog about my experiences with beauty care.

Tuesday, December 14, 2010

Extract of the day:Rosemary

Rosemary


The effects are stimulating, antiseptic, wound healing and improves circulation.
Good for oily, acne scars and mature skin.

Monday, December 13, 2010

Extract of the Day: Aloe vera

Aloe Vera

Anti-inflammatory, hydrating(emollient), calming and softening.
Good for dry, problem skin, psoriasis, eczema, rosacea and couperose.

Sunday, December 12, 2010

Christmas Nails

Some more Christmas nails

Would love to hear what you think

Extract of the day: Blueberry

Alot of active ingredients are natural(exracts), so you should know what you are using.
I'll be posting everyday a plant or bush and the effects they have on the skin.


Blueberry  
Effects are softening, calming and anti-inflammitory   
Good for dry, sensitive, couperouse and rosecea       

Saturday, December 11, 2010

Curved finger problem

The index and ring finger is usually the issue here.
The index finger will have a slant  towards the thumb or towards the middle finger. Extra care must be taken when shaping this nail.

If the slant is ignored and filed the same way as the rest of the nails, the curved finger will be emphasised.

The nail must be filed away more on one side then the other, to give the nail a more straight look.


I was only able to find example pictures, now I need to find somone with a curved finger. lol

Friday, December 10, 2010

A good cuticle clip

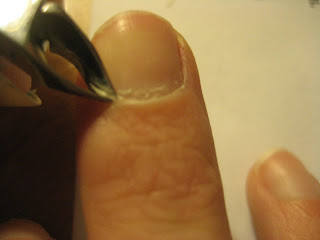
This is one of my nails I let go for a few weeks, notice how my cuticle is out grown and it's all dried up(winter nails lol)
I soaked my nail in water with a little bit of vitamin E massage oil(to make it more hydrating). For about 5 minutes.

When I was done soaking I dried my nail and pushed up a cuticle, you can do this with a stainless steel cuticle pusher or a wooden flat angled nail art sticks, but you must be gentle.
This is where you're nail grows from.
Pushing the cuticle up before clipping I find helps see how much you want to get.


 Once this is done, you can start clipping the cuticle but I wouldn't advise doing it with anything other then a cuticle nipper. Don't clip too much since the cuticle is there to protect the new nail that's growing out. If it pinches, usually you're too far.
 
Clip but do not pull the clipper away. This is how we cause frays with the cuticle. Does not look nice and sometimes hurt.

This is the after shot. Before cuticle oil.

                       Would love to know if this helps anyone, or if I left anything out.

Right length for you

The free edge(white of the nail) should be about a little less then half of what the nail bed itself is.


It is the sides of the nails that give the plate it's support. If the sides are filed away to give the nail a narrower apperarance, then there is less support.


My thoughts of the day lol

Thursday, December 9, 2010

Color coding for the right nail color

The right shade of varnish will minimise lines, wrinkles and make the skin look healthy.
The wrong shades will emphasise blemishes and make the skin look shallow blueish or grey.


If you have very short brittle nails, you would want to use a pale, calm color so you don't draw too much attention.
While if you have "knobby" joints, sometimes using bright vibrant colors are better so you draw attention to the nails and not to your nuckles.


Colors are made up of three main colors(base) yellow, blue and red.
In color coding, colors are to be seen as being blue-based(cool and synthetic) or yellow based(warm and natural)


Color coding is also based around the four seasons:


Autumn and spring types are warm(yellow base), having a fair, freckled, golden cast to their skin, red-golden hair, brown eyes.

Winter and summer types are cool(blue base), having a pinkish cast to their skin, gret-blue eyes.


Also I find in spring and summer the most popular colors are lighter, cleaner and brighter.

Where in winter and autumn it seems to be more darker and mellow colors.


Not quite sure if I covered everything, i'll be posting pictures of the differences of skin tones and the difference of them once the right color is chosen, when I can take them ;)


                                              Comment are always appreciated   
                                                                 Sleepy flower

Friday, December 3, 2010

HOW TO: Christmas candle


Start off by the out line of the candle, making a lop sided mushroom head with two verticle lines under.

Fill in with color of choice for candle.

Take black again, at the top of the candle, make an arched line from one egde to the other to give the candle a little depth.
Make a little black line for a wick in the middle of this and fill in with candle color.

To make the garland at the base of the candle, I take my oldest brush(scruffy brush) and dab down to get sponge look. I always have to dab on paper first to get the right effect.   

Add three little dots to make holly, my holly isn't red lol. then dab the green around.
Use yellow to make a flame(up side down tear drop) with a little orange up side down tear drop inside near the bottom.

Finished nail.
Hope this was helpfull! :)

'Tis the season nails

Starting my Christmas nails.


Comments are always appreciated

Friday, November 26, 2010

How to Marble nail


  This look is called marbling, to achieve this looks all you need is different color lacquers (works best with colors only a few shades off of each other) and a toothpick. This works with nail polish and acrylic gels.

You start by painting horizontal stripes on the nail bed. I like to start with my darker color, then go lighter shades of blue. You want it to be thick enough that it won't dry by the time you try to run the toothpick through.

Now take you're toothpick, start at the top of the nail (near the cuticle) and run it down the nail.


Keep going sideways on the nail.
Do not rub off the toothpick each time you make a stripe.

Notice my second stripe had pink at the top, it's because I didn't rub off my toothpick, you might have to go back to the first one you did to get this.


This should be the end result. Give a top coat once dried.


                                                                                                  Comments are appreciated

Sunday, November 7, 2010

Homemade exfoliant and info

The benefits of exfoliation is removing dead skin cells(squams) from the epidermis, removes dirt, even skins tone and reduces fine lines.

I try to explain to people that not only people with dry skin should exfoliate.
If you have a oily skin type, exfoliation can help you reduce the dirt, bacteria and keratin build up on the skin which makes up whats inside a pimple(papule, pustule) and blackhead(comedone).


There is 3 different types of exfoliation:

Granular:Usually will be a emollient(semi-liquid) with smooth beads to rub away dead skin cells. I've seen homemade kinds with coffee grinds and almond oil, yogurt and oatmeal.
This I would more recomend for someones body, not a face. Simply because it could be very irritating by the harsh rubbing of the beads.

Gommage: Placed on the face like a mask(with a brush) it will be a paste texture usually. Apply, wait till it hardens like a mask then take one hand to stretch skin out and other hand to rub off. It isn't as harsh as the granular exfoliant.
Now the gommage I worked with, was for oily types, while drying it would absorb secretions and when rubbed off, would leave skin matte not shinny.

Enzymatic: Like a mask also, but instead of manually rubbing it off, there are enzymes or AHA's in the product which will act like little pac men and "eat" the dead skin cells. Once the peel is on for a few minutes you simply remove. This is the best option for any skin type, because it's the only exfoliant that isn't harsh, no rubbing.
                                                        
                                                        To make an enzymatic exfoliant
You can find enzymes in a lot of fruits but pineapples and papaya are the best. Pineapple's enzyme is called bromelain and papaya's is papain.
The Gelatin is for consistency and texture, but some studies say that the gelatin's collagen may help you're own.


What you need:
  • 1 fresh Papaya or Pineapple(raw not canned)
  • 1 package of unflavored Gelatin
  • 1.5 fl oz. Mineral water (=3 tablespoons)
How to do it:
  • Peel the papaya, take out the seeds and cut it in pieces. Put these in a food processor and mash them thoroughly. Strain this through cheesecloth and keep the juice for later.
  • Put the gelatin and the mineral water in a small pan. Then gently warm this up over a slow fire, while constantly stirring, until the gelatin is completely dissolved. Pour this in a bowl and add the papaya juice.
  • Let this cool down for a while and place the bowl in the fridge until it is firm, and almost set but still liquid enough to be applied, this will take about 25-30 minutes.
  • Stir to see if it is the right thick consistency, if so spread the paste gently and equally(not too thick) with a facial mask brush, on your clean face and neck; keep the eye and upper lip area clear
  • Now lie down, relax and leave the mask on for 15-20 minutes.
  • Then peel it off, start under your chin and peel it off in an upward motion, this will tingle a bit. Finally rinse with warm water and a soft warm wash cloth, end with a splash of cold; pat your skin dry with a clean towel. Or if it didn't dry like that(mine didn't the first dew times) just rinse off. 
                                                                             Comments are always appreciated

Monday, November 1, 2010

2010 Mini masterpiece contest winners

At nailsmag.com they have a channel called nail art and it holds a mini master peice contest. For manicurist to show off their stuff. It was their 3rd year and I think they keep getting better. The rules were to reproduce a well-known work of art on a single nail tip. Which took the first place winner 10 hours! They are all beautiful yet there is only one 1st place. Unfortunately I can't save the pictures to re post, so here is the link.  Comment if it doesn't work please.


http://www.nailsmag.com/Channel/Nail-Art/Tag/CONTESTS.aspx

My halloween makeup


I did my halloween makeup (these pictures are before I did my hair). It was done with cream eyeshadows.

Thursday, October 28, 2010

Saturday, August 7, 2010

No fun in the sun Part 1 (BCC)

Considering it's summer time and alot of people tan, I just thought i'd remind everyone that UV radiation can be very harmful!
UV exposer can lead to premature aging and wrinkles and can even cause cataracts and snow blindness and other skin conditions like solar keratosis where the skin starts over producing keratin to toughen up to protect it's self(skin feels like leather). But the most harmful side effect of sunbathing is cancer!! 


Basal Cell Carcinoma
 Basal cell carcinoma (BCC) is the most common form of cancer. There's about a million new cases each year. BCC is a malignant tumor that begins as a papule(inflamed solid elevation of the skin) and grows in the basal layer of the epidermis, becoming a crater that erodes, crusts and bleeds.
 The SUN is one of the biggest causes of BCC. The sun is 90% responsible for skin cancers. Basal cell carcinoma is most seen in the sun exposed areas like face, ears, neck, scalp and shoulders.

The sun damage responsible for BCC cancer usually happens years(10-40 years) before the cancer even begins.


People who sunburn easily, usually fair skin have a higher chance then darker skin of getting BCC.
Places closer to the equator have a higher UV index so they have a higher chance of getting BCC
You also have a higher risk of getting it if there's family history.

People who get basal cell carcinoma once, are more likely going to get more. Often the second one will be close to where the other spot has been.

Sometimes BCC can resemble skin conditions like psoriasis or eczema. But there are five common characteristics that are seen more often, usually two or more of these characteristics will be present.
Some of these characteristics are:

An Open Sore

Most common on the chest, shoulders,
arms and legs. Sometimes the patch

might crusts, itch or bleed.


A reddish patch/ irritated area
Most common on the chest, shoulders, arms or legs.
 Sometimes the patch might crust, itch or hurt


A shiny bump


Usually a round bump that protrudes above the surface of the skin. It can be pink, red, white, tan, black, brown or translucent. Sometimes it can be confused with a mole.


A pink growth


A slightly elevated bump that has a crusted center.
It will slowly grow and tiny blood vessels may come
to the surface


A scar-like area

Can be white, yellow or waxy and has poorly defined borders. The skin looks shiny and taunt, this is a sign that small roots are there, which makes the tumor larger then it appears on the surface.


Prevention and treatment

Stop sunbathing or going to tanning beds. Even if you don't burn and go red, you're still causing skin damage. Wear SPF 15 or higher everyday. Even on a day with overcast, the UV radiation can still penetrate through the clouds.

Surgery is the only way to remove basal cell carcinoma. Fortunately there are a couple different types of surgery that can be preformed to remove the cancer. The surgery will leave a scar, there is no way of removing BCC without leaving that darn scar.
  
Different types of surgery


Electrodessication and curettage: The cancer is burned and removed with a sharp instrument.
Cryosurgery: Freezing the cancer to kill it.
Excision: The cancer is cut out, along with some healthy tissue also.
Micro graphic surgery: The cancer is also cut out along with some healthy tissue, then the doctor will use a microscope to see if there's any remaining cancer cells.
Laser surgery: A beam of light is used to remove the cancer.


If you have a new growth somewhere on you're body always see a dermatologist about it. And always wear sunscreen, SPF 15 or more!!

Hope this helped and comments and questions are always appreciated

                                           Sleepy Flower

Thursday, August 5, 2010

confussion between skin types and skin conditions

When people come to me and say, "my skin type is sensitive or dehydrated" that's not really the case. These are skin condidtions that any skin type can have. A person with sehboric, oily or dry(skin types) can all have redness of the skin(congested/sensitive), dehydrated(Transepidermal water loss) and be mature.

To get a good look at the skin type we must first treat the condition.

Ex Client presents tight pores, along with congested redness
 My skin analysis would be dry with erythrosis(congested redness).

I'd treat the erythrosis first with a decongesting treatment(to reduce the redness) followed by a nourishing treatment(make skin supple not dry)


  Questions and comments are always appreciated                                          
                                                                           Sleepy Flower

Wednesday, August 4, 2010

Can a teabag be used as a nail wrap?

There are three different types of nail wraps manicurists use, fiberglass, silk and linen. With acrylic it can be sculpted on the nail with a metal cone and elongated to give you artificial nails. Applied to the nail itself, it can be used to repair brittle, broken or split nails.


The point of this, is to see if teabags can be used as a nail wrap, not to give you longer nails but to strengthen them and repair.
All I needed was a Orly top 2 bottom, color of choice, toothpick, teabag(with no tea inside) and pen


You can clearly see where my nail is broken :( Now I am going to put the teabag wrap on my complete nail bed, I would suggest doing this for brittle and weak nails to make them stronger. But for a crack or a chip like this I would only put a piece to mask only the crack.
 

I took the tea bag and traced the outline of my nail and cut it out. Put a base coat on the nail and gently put the tea bag on over with the toothpick. I left the teabag a a little longer then my nail to show you. Being my first time using teabags I wasn't sure how much base coat to put before, in this picture I didn't put enough and didn't smooth out the air bubbles with the toothpick.


After I used the cuticle nippers to cut away the excess, it is already looking better


The color I used is Essie mademoiselle. A light shade to show that unlike the linen wraps, you don't have to use the dark lacquers to hide it.


Conclusion: I found it worked. It lasted on my nail for 4 days until it started to peel off a little at the free edge(Keep in mind I left air bubbles, this can cause lacquer not to last as long). So I used acetone and it came off right away. The big tear wasn't gone but it held my nail together and no one noticed. If you keep doing this to you're nail i'm sure it would give your nail enough time to grow so you can file that tear or split away, and it would keep weak brittle nails from breaking anymore then it is. You're nail also gets to breath under tea bags unlike fiberglass.

Comments are always appreciated
                                                                                                                Sleepy Flower